Showing posts with label create. Show all posts

Saturday, June 30, 2012

Kids Craft - Paper Plate Butterflies

Warm weather and sunny days are here again! HOORAY!!!

We like to spend lots of time outside when the weather is good but rainy days put and end to outside fun pretty fast. At least until the rain goes away.

We were feeling crafty while we were watching the rain come down outside and decided to make some bright butterflies to cheer us up until the sun came back out.


They were really easy to make and we used things we had on hand so there was no shopping for any extra bits and bobs.

Materials Required:
Paper Plate (we used white but coloured plates would work too)
Scissors
Pipe Cleaners
Bingo Dabbers
Glitter Glue
Stapler
Markers/ Crayons

Directions:
1. The first thing we did was figure out how to make the butterfly wings. We made 4 triangles on the plates. 2 small ones on each side and 2 larger ones on the top and bottom. Draw them on with a crayon and cut out the triangles. This will give your butterfly wings.


2. Once your butterflies are cut out it is time to decorate!

We used Bingo dabbers to decorate yours but the possibilities are endless. Use crayons, markers, paint, glitter glue, ribbons, sequins, feathers, stickers, anything your heart desires.


3. Once the decorating is finished it is time to add the antennae. Take a pipe cleaner, fold it in half; curling each end around your finger to make them round and staple it to the centre of the butterfly. You can also add a string here if you want to hang your butterfly from anywhere. We stuck ours on the fridge with some clip magnets so did not add any strings.


These were lots of fun for us to make on a rainy Spring day and they really made the kitchen brighter!


Thursday, May 31, 2012

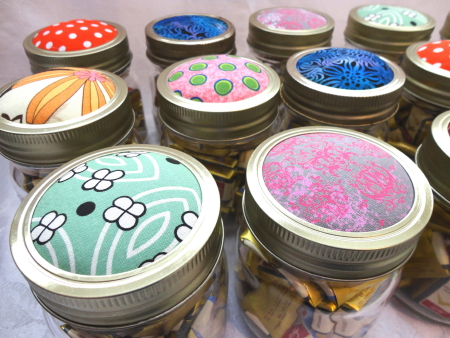
Mason Jar Pin Cushions

 
 I have wanted to try a project like this for quite awhile but have always used my canning/ mason jars for making jams and preserves and never had any jars to spare.

I was gifted 2 boxes of old canning jars without lids. The jars were in great shape and I figured that they would be perfect to finally make this project. I found some lids with the centre seals for the jars at a local hardware store.

I also wanted to make a thank you gift for the ladies of the Rimbey International Historical Quilters Guild. They hand quilted a quilt for me and I wanted to give them a little something to let them know how much I appreciated it. I filled the jars with little chocolate bars from the local wholesale club. They looked great and made a wonderful gift. All the recipients were thrilled!

Click on the link for materials and instructions to make your own Mason Jar Pin Cushion

Sunday, April 1, 2012

Project of the Month - April 2012


I was searching for projects for my friend who had a baby last summer. We both have extensive collections of fabric scraps and we were looking for something simple to make as a scrap buster project and that would be fun for the baby to play with.

I found this great tutorial for Fabric Beach Balls from The Purl Bee. We thought it would be a fabulous project and we were right!

I made 3 medium sized Fabric Beach Balls out of various fabrics that I had in my stash. It took about an hour for me to make all 3 balls, including cutting & stuffing time. My daughter helped me put the stuffing in and she had lots of fun making sure that they were the perfect shape and size.
I did leave off the fabric circles on both sides. I liked the way the intersecting seams looked.
The tutorial was simple and easy to follow. I think I will make them again the next time I need a baby gift for someone!


Monday, February 27, 2012

Project of the Month - January 2012 Complete

Here are the two micro fleece nightgowns that I made for my daughter in January.

They are super warm and fuzzy and perfect for the cold winter nights in Alberta.

Most importantly - she LOVES them!

I do have some of the fleece left over from this project. I am saving it for now and waiting for a burst of inspiration.

Friday, November 18, 2011

Placemat Cosmetic Bag

I love it when I find something great and get that bolt of inspiration that fuels me and keeps me creating.


I was wandering around a shop in town and saw these fabulous placemats. It was love at first sight, but we don’t use placemats on our kitchen table. Instead, I had a vision of something fabulous and useful instead, a new cosmetic bag. My old one has been with me for more years than I can remember and is in a very sorry state. It needed replacement and I was inspired - what a great combination!


I bought several placemats made with all kinds of different fabrics and interfacing. I found the easiest ones to work with had lighter interfacing in them, otherwise it makes it too hard to get the zipper in.


Here is an easy tutorial to make your own cosmetic bag from a placemat. 
Placemat Cosmetic Bag Tutorial

Leave a comment & let me know how yours turns out.


If you love the way they look but do not want to make your own they can be purchased in my Etsy shop too.

Thursday, August 4, 2011

Project of the Month - August 2011

I have a project for myself this month and plan to use up some fabric from my stash. 

It's a gorgeous, navy and white bordered fabric. I am excited to see how the project turns out.

Check back later for some photos of the finished piece!

Saturday, January 15, 2011

Fabric Dollhouses

Finally, my work on my bachelor's degree is done and now I can concentrate on some fun things. I have a whole list of great blog posts to write and I hope that some of them are useful and fun for others as well.

Every year I make my daughter something special for Christmas. This gift is something just from me and it has become a cherished tradition in our house. As soon as Christmas is over for the year I start dreaming and looking for next year’s gift. 

I saw this tutorial from UK lass in US sometime during the summer and thought that a fabric dollhouse would make a great Christmas gift for my little girl.

I got the first one about half done and thought that if my little girl would love it, so would her friends. I figured out how many of her girl friends we would need birthday gifts for this year and cut out 4 more – one for each of them and 1 spare just in case I needed it. They are all different and have their own personalities, just like her friends!

It was a little tough, at first, to figure out how all the pieces were supposed to go together but once I got the first one done the other 4 came together quickly.  I used felt to make the details like windowsills, a fireplace, complete with a toasty fire, and the door. I cut little pieces of fabric and positioned the pattern so that someone was looking in or out each window.

The first dollhouse I sewed the felt details onto and that took a very long time! The other 4 houses I used fabric glue instead. It worked great and was much faster too. I used some rick rack and sequins to fancy up the doors as well. I also bought some little dolls to go with each dollhouse.

My daughter loved her little house and plays with it nearly every day. It has gone on car trips, trips to the grandparents and even the grocery store, though we only brought one doll along on that trip so there was less for me to keep track of.

Check out the tutorial yourself here and make one for yourself!

Thanks so much for the tutorial! I had a great time making it and my daughter loves it!

Thursday, August 26, 2010

Summer Wedding Showers & Chocolate Cookies

A friend of mine is getting married next month and I attended a wedding shower for her on Tuesday night. It was really great to meet some of her oldest friends and it was really neat for me to be included in that group of friends :)

Her friends put on a "Something Blue" wedding shower for her and it was great! Her friends did a great job and everyone had a good time. There were games and prizes, good conversation and of course great things to eat, blue cupcakes and even blue punch!

The weather was perfect for this outdoor party and the garden setting was gorgeous. I sure wish that my yard looked that nice!

I found a great serving dish at Pier One, for part of her gift, and baked some delicious cookies to take to the party. The recipe is from Martha Stewart Everyday Food (click on the title for a link to the recipe). My daughter helped me bake the cookies and we had a great time! We used chocolate chips instead of chunks and used a cookie scoop to make them just the perfect size for a decadent treat!

Here is a snapshot of our picture perfect treats.


Thanks for a great evening!

Thursday, August 19, 2010

At long last ......


At long last the much anticipated purse for my friend is DONE!!!!

I am so happy with the way it turned out!!!

It is bigger than I anticipated but now she will have lots of room to carry all of her most important things with her.

I am delivering it in September when we got out to visit her in Victoria, BC.

I am really looking forward to seeing her :)

Here is a sneak peek at it's total fabulous-ness!!


Thursday, June 24, 2010

INTRODUCING - my brand new Auto Bag!!!!


A stylish and durable bag for your vehicle.

Use it for a trash bag, on it's own, or lined with a small plastic bag.

Use it to keep toys, snacks, maps and all your other goodies organized and easy to find.

8.5"H x 8.5"W x 4"D with a 24" strap

100% cotton outer fabric, middle layer of heavy duty interfacing and lined with laminated, water-resistant canvas.

These will be available at my table at the Bentley Farmer's Market, this Saturday, June 26. I will be listing them in my shop next week if there are any left.
Click on the title to be sent to the Facebook album with all finished ones to choose from.
My little assistant made the fabric choices and I think that she did a wonderful job!

If you see one you cannot live without, send me a message and we'll work out the details.

Saturday, May 29, 2010

The Project continues

POCKETS, POCKETS, POCKETS!!

I took a little break from my friend's purse to make some things for my daughter and some more things for my shop. I still have lots more projects in the works but really wanted to get to work on this purse again. I am still totally in love with the fabric and really want to see the finished results.

I added pockets to the inside and outside of the purse today. The outside pocket has a flap that closes with a magnetic snap to keep everything safe inside. It is big enough for a cell phone, a set of keys, chewing gum, CD's, a small notepad, or whatever else a person needs close and easy to access.

There were only supposed to be a few small pockets inside but I really like lots of places to stash things when I need to, so I added extra big pockets to the inside and then split them up in a few places. The result is lots of places to keep all kinds of great things.


I got the rest of the lining finished too and am hoping to put together the rest of the outside over the next week.

I bought some leather handles, which will look really sharp. They arrived a couple weeks ago and I have been getting anxious to put them on the purse and see the final effect.

Saturday, April 10, 2010

New project in the Works

Here is the first picture of a new project I am working on:


I am working on a new project for my very good friend.


She picked my absolute favorite fabric and asked me to make her a handbag with it.


She picked the style and I started cutting out pieces this week.


I just have the outside fabric left to cut - a striking Black & Red Batik.


I confess I am a little bit nervous about cutting it because if I mess it up there's no going back. There is no more of the fabric at the shop where I bought it in Salmon Arm, BC.


I am thinking of posting some updates here as I work on her bag - then she can see how it looks as I work on it.
I will post some more once I get some sewing done

Thursday, December 3, 2009

Reusable Holiday Gift Bags


It's that time of the year - the Holidays are here!!

We are all busy shopping for and wrapping the perfect gifts for everyone on our holiday lists.

Who says being green has to be boring? These bags are functional and they look great!

Enjoy the holidays and help look after the environment. Avoid sending all that gift wrap, tape and ribbon to the landfill.

These reusable bags make gift wrapping a breeze - just open the bag, pop in your gift, pull the ribbons closed and you are done.

  • Use for wrapping holiday gifts or storing decorations

  • Smart alternative to gift wrap or plastic gift bags

  • The perfect way to beautifully wrap all the gifts you get for everyone on your list

  • Compact & lightweight

  • Double satin ribbon drawstring closure - bags are made of 100% cotton fabric

  • 100% Canadian Made

These bags are a great way to avoid using mountains of gift wrap and tape for all your holiday gifts.

Use one of these handy Reusable Fabric Gift Bags in place of expensive paper gift wrap
OR
Wrap your gifts and use one of these bags to keep multiple gifts for one person all together.

After the holidays these bags can be used year round to store toys, books, DVD's, CD's, beauty products and anything else you need!

The bags come in 3 standard sizes: Medium, Large & X-Large.

These bags are also available in custom sizes to accommodate any sized gifts. Let me know the size bag that you need and I will be happy to create it for you.

Machine wash, tumble dry – these bags are handy and easy to use.

All seams are serged / overlocked for extra durability. These bags are not lined.


Tuesday, April 14, 2009

New Blog

It's a good day to spend inside.

Snowing, blowing and cold outside - inside we are peeking out the windows at the snow and hoping that Spring returns soon. We already miss the sunshine that we were enjoying last week.

This is the first post on my newly minted blog.

Follow me as I have fun creating new things with my sewing machine and as I learn how to do some new things with this blog.

Nicole