Showing posts with label do it yourself. Show all posts

Thursday, May 31, 2012

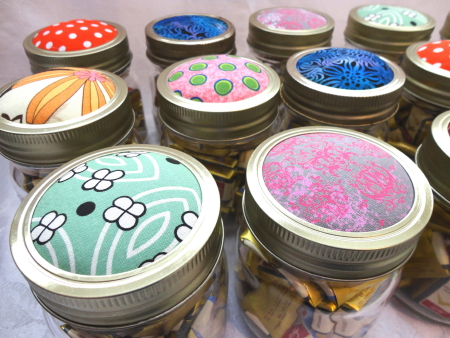
Mason Jar Pin Cushions

 
 I have wanted to try a project like this for quite awhile but have always used my canning/ mason jars for making jams and preserves and never had any jars to spare.

I was gifted 2 boxes of old canning jars without lids. The jars were in great shape and I figured that they would be perfect to finally make this project. I found some lids with the centre seals for the jars at a local hardware store.

I also wanted to make a thank you gift for the ladies of the Rimbey International Historical Quilters Guild. They hand quilted a quilt for me and I wanted to give them a little something to let them know how much I appreciated it. I filled the jars with little chocolate bars from the local wholesale club. They looked great and made a wonderful gift. All the recipients were thrilled!

Click on the link for materials and instructions to make your own Mason Jar Pin Cushion

Sunday, April 1, 2012

Project of the Month - April 2012


I was searching for projects for my friend who had a baby last summer. We both have extensive collections of fabric scraps and we were looking for something simple to make as a scrap buster project and that would be fun for the baby to play with.

I found this great tutorial for Fabric Beach Balls from The Purl Bee. We thought it would be a fabulous project and we were right!

I made 3 medium sized Fabric Beach Balls out of various fabrics that I had in my stash. It took about an hour for me to make all 3 balls, including cutting & stuffing time. My daughter helped me put the stuffing in and she had lots of fun making sure that they were the perfect shape and size.
I did leave off the fabric circles on both sides. I liked the way the intersecting seams looked.
The tutorial was simple and easy to follow. I think I will make them again the next time I need a baby gift for someone!


Thursday, February 2, 2012

Fleece Rag Quilt

This Fleece Rag Quilt is quick and easy make yourself. It makes a great quilt to snuggle up in on a cold night or a fabulous gift for someone.
I had some fleece leftover from another project and needed a baby gift for a friend of mine. After some brainstorming and a little experimentation I made this super cute Fleece Rag Quilt. The fleece that I used was on sale when I bought it for my other project so it was a very frugal gift as well.


Click on the link to see the tutorial in Google Docs Fleece Rag Quilt.

I am also going to be expanding this blog beyond recipes, projects and tutorials. I am often asked to share my tips & tricks for all kinds of things from saving money to saving time and I am going to share them with you too.

Friday, November 18, 2011

Placemat Cosmetic Bag

I love it when I find something great and get that bolt of inspiration that fuels me and keeps me creating.


I was wandering around a shop in town and saw these fabulous placemats. It was love at first sight, but we don’t use placemats on our kitchen table. Instead, I had a vision of something fabulous and useful instead, a new cosmetic bag. My old one has been with me for more years than I can remember and is in a very sorry state. It needed replacement and I was inspired - what a great combination!


I bought several placemats made with all kinds of different fabrics and interfacing. I found the easiest ones to work with had lighter interfacing in them, otherwise it makes it too hard to get the zipper in.


Here is an easy tutorial to make your own cosmetic bag from a placemat. 
Placemat Cosmetic Bag Tutorial

Leave a comment & let me know how yours turns out.


If you love the way they look but do not want to make your own they can be purchased in my Etsy shop too.

Friday, April 1, 2011

Decorative Bulletin Board


We finally got rid of all the old, beat up, college dorm style furniture from our home office. I am so excited to have an actual grown up desk that looks really nice and works the way I need it to. 

Our old desk was quite tall and took up a bunch of the wall space. I had pictures and favourite quotes taped on it in various places where I would see them when I looked up from working.

The new desk is all one level which left me with a big, blank open space right above the computer monitor. It was really not very inspiring and I missed looking at my pictures. I looked at it for a few weeks and decided something had to be done so I enlisted my daughter to help me make a custom bulletin board for the space.
I was honestly not sure how it would turn out because we had never tried anything like that before. 

We made 2 different bulletin boards. One hangs in my office above my desk and the other one hangs in my bedroom beside my bed. Both are filled with pictures, quotes, aspirations, inspirations, artwork from my daughter and other things I love to look at.

The project turned out really well and was easy and inexpensive too. It was easy enough for my 3 year old daughter to do and fast enough to keep her attention from start to finish (not including the drying time).


Supplies
1 framed, unpainted cork bulletin board in your desired size
Black acrylic paint
Little dish or plate for paint
Foam brushes
Glitter Glue
Spray adhesive
Piece of fabric the same size as the cork part on one of the bulletin boards

Directions
1.       Prep the bulletin board by taping around the frame to keep the paint off the cork. 


2.       Paint the frame of the bulletin board black on the front & sides. My daughter had a great time helping with this. Allow to dry.

3.       For the glitter glue board pick your favourite colors and make a pattern with the glue on the black frame. Allow to dry.

4.       Spray frame with clear acrylic sealer. Allow to dry.

5.       Remove tape and hang up your new bulletin board.

6.       For the fabric bulletin board, after the acrylic paint has dried, spray the frame with clear acrylic sealer and allow to dry. Remove the tape.


7.       Cut your piece of fabric to the same size as the cork part of the bulletin board. Try to get it as close to the same size as possible.

8.       Following the instructions on the can, spray the cork board with spray adhesive and leave the time recommended for it to get tacky. Try not to get it on the frame – it will make it sticky until it dries.

9.       Starting on one side and going slowly, smooth the fabric, right side up, onto the cork board. It is like putting on wallpaper, go slow and try not to get any bubbles between the fabric & the cork. I used a ruler to do this so I could make sure I got it all stuck down with no bubbles. It did take me a few tries so if it doesn’t work quite right the first time, be patient and try again.


10.   Once it is all pressed down the way you like it, allow it to dry according to the instructions on the can. We left ours to dry overnight to make sure that it was good and dry.

11.   Hang it up and fill it with your favourite things.

Saturday, February 19, 2011

Personalized Applique Bath Towel or Beach Towel

My daughter was invited to a birthday party for a friend of hers this weekend – a little boy.

She wanted to get him a present that she knew he would love and something that was unique and “special just for him”

Something that he would love – no problem – he LOVES Thomas the Train so she picked out a train for him.

Something unique and “special just for him” was a little tougher to find so I turned to my sewing machine and made a personalized bath towel. I made several of these towels last year for my daughter and some of her other friends. I figured out how to do them based on trial and error. There were quite a few errors before I got it right!!

These personalized towels are great to take to the beach, swimming lessons and on holidays. You always know which towel is yours at a glance.

This is an especially great gift for those people with unique names.

Depending on your choice of towel and fabric these can also be a very economical gift. They do take time but supplies are not very costly and should be easy to find. Make your fabric choices based on the person the towel is for, OR use it as a stash buster project and use up what you have on hand. The small amount of fabric needed makes it pretty easy to do both.

My daughter picked out the fabric for each of the letters in this example and kept me company while I sewed it. She was very excited to give her friend a special, personalized gift and she said that he was very excited to receive something with his name on it.

Here is a quick and easy tutorial on how to make a personalized appliqué bath towel.

Supplies:
1 bath towel (We used a large bath sheet but you can use whatever size you want)
HeatnBond iron on adhesive
Assorted cotton fabric scraps for letters 
             (You can experiment with different types of fabric if you want, BUT cotton washes really well)
Scissors, pins, iron, marking pen & thread

Decide what size and type of letters you want – I photocopied some from an old craft book I had at home. You can draw some freehand or find a template on the internet to use.It is easier to sew larger block style letters than small, swirly ones!

Cut pieces of fabric slightly larger than the size of the letters you want to use. I cut my pieces in squares.

Follow the instructions on the HeatnBond to attach the fabric pieces to it.

Basically, arrange the fabric pieces, right side up on the HeatnBond. Run your iron over them to activate the adhesive on one side. 

Once the pieces are all secured to the HeatnBond – trace your letters onto the fabric and cut them out.

Lay the towel out and find the middle. Mark it with a pin so you know where it is. 

This name had 6 letters. I positioned the letters 4” from the top of the towel, with 3 letters on each side of the centre line. I put these letters all in a straight line but you can space yours out any way you want. Make them wavy, diagonal, curved, whichever way you want.


Once you have the spacing figured out, peel the back off the letters. Recheck your spacing to make sure that it is just the way you want it.

Iron the letters to the towel. Make sure that they stick well so that it will be easier for you to sew. If you don't secure them well here they will move when you begin sewing around them.

Once all the letters are ironed down your towel should look something like this.

The next step is to stitch around each letter to seal the raw edges and make the letters stand out a bit. 

It is best to go slowly to make sure that the stitches are even and neat.

This is the time consuming part, especially if the name is a longer one. 

I use a basic zigzag stitch with a stitch length of 2.5, and stitch spacing of 1.0. On my machine it makes a very nice satin stitch. I recommend you try a few test runs to get the setting right BEFORE you start stitching on the towel. 

Stitch slowly around each letter, covering up all the exposed edges.  

Once all the letters are stitched around, clip any loose threads and VOILA!!!

Here is the finished towel. 
Saturday, January 15, 2011

Fabric Dollhouses

Finally, my work on my bachelor's degree is done and now I can concentrate on some fun things. I have a whole list of great blog posts to write and I hope that some of them are useful and fun for others as well.

Every year I make my daughter something special for Christmas. This gift is something just from me and it has become a cherished tradition in our house. As soon as Christmas is over for the year I start dreaming and looking for next year’s gift. 

I saw this tutorial from UK lass in US sometime during the summer and thought that a fabric dollhouse would make a great Christmas gift for my little girl.

I got the first one about half done and thought that if my little girl would love it, so would her friends. I figured out how many of her girl friends we would need birthday gifts for this year and cut out 4 more – one for each of them and 1 spare just in case I needed it. They are all different and have their own personalities, just like her friends!

It was a little tough, at first, to figure out how all the pieces were supposed to go together but once I got the first one done the other 4 came together quickly.  I used felt to make the details like windowsills, a fireplace, complete with a toasty fire, and the door. I cut little pieces of fabric and positioned the pattern so that someone was looking in or out each window.

The first dollhouse I sewed the felt details onto and that took a very long time! The other 4 houses I used fabric glue instead. It worked great and was much faster too. I used some rick rack and sequins to fancy up the doors as well. I also bought some little dolls to go with each dollhouse.

My daughter loved her little house and plays with it nearly every day. It has gone on car trips, trips to the grandparents and even the grocery store, though we only brought one doll along on that trip so there was less for me to keep track of.

Check out the tutorial yourself here and make one for yourself!

Thanks so much for the tutorial! I had a great time making it and my daughter loves it!

Monday, May 25, 2009

Anti-Skid Socks & new PJ's

I spent some time last week working on new things for my daughter.

First she needed some new Pj's for summer and I could not find any I liked. So I made them myself. 3 new pairs of Pj's which she loves :)


Next - she has had a growth spurt and outgrown most of her "little girl" socks. I looked all over to find bigger anti-skid socks for her but could only find them in small sizes.
I decided to try making my own "grippy socks". I read somewhere that it was possible to do it with fabric paint. I tried it and am sharing the results. I hope that many of you can make good use of the very easy instructions.
Materials needed:
Fabric paint (I used the clear dimensional kind that kinda sticks up)
(I got a tube on sale for $1 - I have made 35 pairs of socks so far and have not used the whole tube up - this is WAY less expensive than buying pre-made "grippy socks")
Socks (pre washed)
Directions:
Fold the socks so that the entire bottom is facing up.
Paint or Dab little dots of paint over the bottom of the socks. I tried several different patterns (squiggles, dots, straight lines) and the dots seemed to work the best. I made my dots in lines but you could use any design or pattern you like. You can make the dots bigger or flatter depending on your preference as well.
FYI the dots did not "lift off" after washing several times but the straight lines & squiggles did.
Allow paint to dry according to package directions.

Enjoy!!
They are not quite the same as store bought ones but they have definitely kept my daughter from sliding all over the tile & lino.
She thinks that they are fabulous because now she can wear some of her favourite socks during the day to run around, instead of only wearing them to bed at night.
I made 25 pairs of her non-"grippy socks" into "grippy socks" this weekend. I ran out of room on the table so there are only 20 pairs shown in the picture.
Leave me a comment and let me know how it works out for you.