Showing posts with label sewing. Show all posts

Tuesday, January 1, 2013

Project of the Month - January 2013

Happy New Year!

I hope that everyone had a good time ringing in the New Year.

Winter is in full swing here and it is COLD! We have our extra blankets on the bed and our flannel pajamas out to keep us warm.

Every year I make my daughter new flannel pajamas. This year I picked out 2 very cool flannels: superheros and froggies.

Here is the before:

And here is the after, 2 pairs of super cute, cuddly and warm flannel pajamas.


Monday, October 1, 2012

Project of the Month - October 2012

Another project for my daughter this month - Minky Hoodies.

These ones are a surprise for her. She loves a soft blanket or sweater. I did see them sold in a few different shops but they were very expensive so I decided to make a couple myself instead.

I bought the minky in 2 bright and cheerful colors and bought a new pattern for my collection too.


Here is the finished product, in green, being modeled by my very happy daughter. She LOVES her new hoodies!

The pink one is hanging on the bannister behind her.


Sunday, September 30, 2012

Yoga Mat Strap

This is a quick and easy tutorial. It can be made for yourself or it also makes a great gift.


I needed something to keep my mat from unrolling all over the car in transit to and from my class and to keep it contained when I was not using it. I had been using a piece of tape but that really was not working for me. I already have a gym bag so I did not really want to buy another bag to carry my mat. 

All the materials I used to make this yoga mat strap came from my stash, which made it a very inexpensive project. 

I think that it looks great and it works perfectly to keep my mat together and ready to go when I need it.


Follow the link here to make one of your own Yoga Mat Strap or if you would like me to make one for you visit my shop Nana Brown's and send me a message.

Wednesday, August 1, 2012

Project of the Month - August 2012

I have been slowly going through the house, one room at a time; organizing, changing and updating things. We have been in our house almost 9 years now and it was time to make a few changes and updates.

In the kitchen we made some space by getting rid of things we did not use and moving some things around. I also changed out the curtains on both windows in the kitchen.

I had not really planned on new curtains but I saw these curtain panels in Pier 1 and could not resist.They were on sale for $20 per panel so I bought both of them. I was pretty sure that I only needed one to make the 3 panels but I wanted to make sure that I had enough.


The last curtains that we had up were very nice. They were refashioned table runners, in brown and white but they were getting faded and I craved something bright and new.

I washed up the old ones and tucked them away in the closet. Washed the windows and curtain rods and then put up my new curtains.

Here is the big picture window


And here is the smaller window, over the sink, between the cupboards.


I love them! They make the whole space brighter and lighter. I did only need 1 panel to make the 3 valances. I used the second panel to make a matching runner for the top of my china cabinet and I still have some left over for another project.

I did take pictures while I was refashioning the long panels into shorter valances and will post it as a tutorial in a different post.

Sunday, July 1, 2012

Project of the Month - July 2012

Happy Canada Day! We are celebrating today by watching a parade and some fireworks later tonight. The weather is supposed to be sunny and clear and we are planning on having a great time!

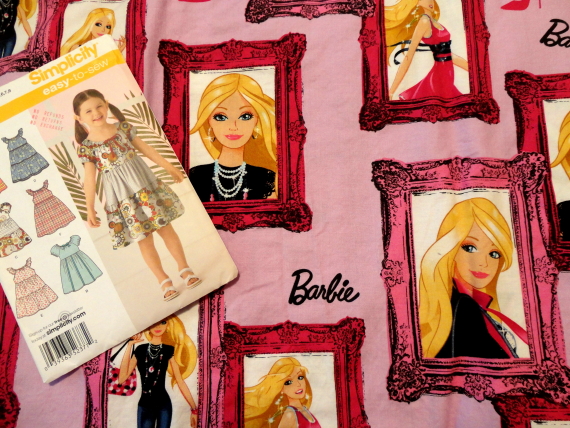
The last time we were in the fabric store together my daughter saw this fabric and HAD to have it! She wanted a pretty summer dress and nothing else would do. The fabric was on sale with my membership card so the dress cost about $12 which I think is a pretty good price for a dress with this fabric.


The Simplicity pattern was one that I had at home and had used before. It is a very good pattern - very clear and easy to use. The dress took approximately 2 hours from cutting to completion and my daughter is absolutely thrilled with her new dress just in time for summer!


Tuesday, May 1, 2012

Project of the Month - May 2012

I have a clunky old make up bag that I think has been around for 10 or more years now. It is really big and beat up and in need of an intervention I think.

Every time we go somewhere I think that I really should make myself a new one. Something pretty and not so darn heavy.

We are planning another trip and I finally made a new cosmetic bag for me a priority.

I used this very bright and cheerful Kaori Kokeshi Bright, geisha girl fabric that I bought from another shop on Etsy.

I used some heavy duty white PUL for the lining, to protect against any spills and added some fusible fleece interfacing to the back of the fabric to provide a little protection for my make up and accessories.

I LOVE how it turned out and am excited to take it with us on our next holiday!

Thursday, March 1, 2012

Project of the Month - March 2012

My daughter received a LeapPad and some games for Christmas this year.


She loves to play the games and it is neat for us to watch how her spelling, reading, math and problem-solving skills are improving at the same time.

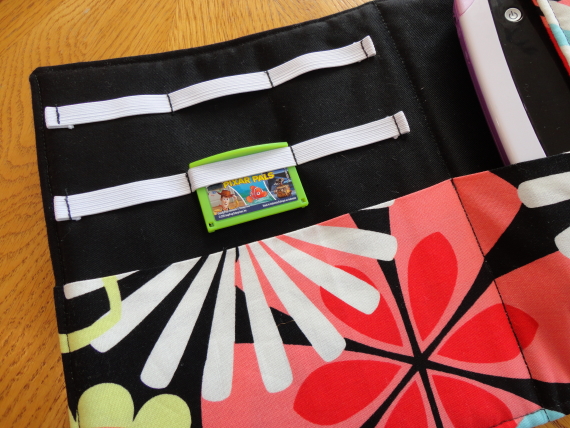
The LeapPad needed a case to store it and the games so we could keep everything together and organized, as well as keep it protected.

We checked out the options in the store and we were not really thrilled with any of them so I figured I would try to make a case myself.

I made some design sketches and changed them a few times until we got it the way we wanted it. My daughter picked out some fabric that I had in my stash and I got to work.

Here is the finished product. It works perfectly and my daughter loves it. She tells us she is going to work on her computer, finds a comfortable spot and gets right to work. She likes that everything is together where she can find it and we can take the LeapPad with us, in it's case, and we do not have to worry about it getting damaged in her bag.


Monday, February 27, 2012

Project of the Month - January 2012 Complete

Here are the two micro fleece nightgowns that I made for my daughter in January.

They are super warm and fuzzy and perfect for the cold winter nights in Alberta.

Most importantly - she LOVES them!

I do have some of the fleece left over from this project. I am saving it for now and waiting for a burst of inspiration.

Tuesday, February 7, 2012

Project of the Month - February 2012

This is a quick and easy project of the month for February. 
We went to visit my husbands family over the holidays and I was inspired by a project that my sister-in-law had completed during the summer.
 
She bought the pattern in a quilt shop in Saskatchewan and made both the 24” and the 18” gum drop pillows. She showed me the 18” pillow that she made in a 2 decor weight fabrics in pinks & greens, a floral print & a plaid stripe print. The pillow was gorgeous and seemed very durable as well. The kids had a lot of fun jumping on it and playing with it. The 18” pillow is the perfect size for a chair for kids or a footstool for adults.


I promised that I would make one for my daughter as soon as we got home. It was a very fast project - about 60 minutes from start to finish. The pattern was very clear and easy to follow. It was a great project - very fun and easy to do. I can see me making more of these as gifts for friends and family.

I used a paisley corduroy fabric that my daughter picked out. We made it a family project and my daughter help me put the stuffing in it. We used a whole bag of stuffing that we bought from Wal-Mart.


The info on the pattern is on Amy Butler’s website and it is available to purchase on Amazon.com http://www.amazon.com/Amy-Butler-Pillows-Ottoman-Cushion/dp/B001762PUY

You can also buy it at independent quilt & Etsy shops. Check Amy Butler’s site for Where to Buy information.


Thursday, February 2, 2012

Fleece Rag Quilt

This Fleece Rag Quilt is quick and easy make yourself. It makes a great quilt to snuggle up in on a cold night or a fabulous gift for someone.
I had some fleece leftover from another project and needed a baby gift for a friend of mine. After some brainstorming and a little experimentation I made this super cute Fleece Rag Quilt. The fleece that I used was on sale when I bought it for my other project so it was a very frugal gift as well.


Click on the link to see the tutorial in Google Docs Fleece Rag Quilt.

I am also going to be expanding this blog beyond recipes, projects and tutorials. I am often asked to share my tips & tricks for all kinds of things from saving money to saving time and I am going to share them with you too.

Thursday, January 5, 2012

Project of the Month - January 2012

A new year brings all sorts of new projects to try.

I am looking forward to making some of the things that have been on my "To Do" list for awhile and to trying out some new projects.

The first project of the year is a sewing project for my daughter.

Something warm and fuzzy for cold winter nights.

Here is a picture of the 2 micro fleece fabrics that I got. 


Check back at the end of the month to see the completed project!

Friday, November 18, 2011

Placemat Cosmetic Bag

I love it when I find something great and get that bolt of inspiration that fuels me and keeps me creating.


I was wandering around a shop in town and saw these fabulous placemats. It was love at first sight, but we don’t use placemats on our kitchen table. Instead, I had a vision of something fabulous and useful instead, a new cosmetic bag. My old one has been with me for more years than I can remember and is in a very sorry state. It needed replacement and I was inspired - what a great combination!


I bought several placemats made with all kinds of different fabrics and interfacing. I found the easiest ones to work with had lighter interfacing in them, otherwise it makes it too hard to get the zipper in.


Here is an easy tutorial to make your own cosmetic bag from a placemat. 
Placemat Cosmetic Bag Tutorial

Leave a comment & let me know how yours turns out.


If you love the way they look but do not want to make your own they can be purchased in my Etsy shop too.

Thursday, August 4, 2011

Project of the Month - August 2011

I have a project for myself this month and plan to use up some fabric from my stash. 

It's a gorgeous, navy and white bordered fabric. I am excited to see how the project turns out.

Check back later for some photos of the finished piece!

Monday, May 30, 2011

The Place to go for great tips & inspiration

The internet is a treasure trove of hints, tips, tutorials and endless inspiration.

Have an idea for something in your head but not sure how to translate it into reality?

Google it and see what results you get back. You may find nothing but often you will find inspiration and if you get really lucky you will find some instructions on how other people have done things themselves.

One of my favorite websites for inspiration and great How-to's is Fave Crafts 

I subscribe to the newsletter and love all the great projects that find their way to my inbox every week. The newsletter connects the reader with Fave Crafts and also with a network of other talented crafty bloggers.

The site is full of great patterns, tutorials and inspiration for crafters of all kinds. I found a few crochet patterns for dolls to make for my daughter and her cousin (I can't crochet but my Grandmother is great and is making them for the girls).

The sewing patterns are great! I have been inspired by many of the baby and children projects as well.

There are lots of simple crafts that kids can do and many eco-friendly projects to choose from too! I have a tutorial post coming soon that was inspired by some of the ways to re-use old glass canning jars that I received in a newsletter.

Stop by, stay and browse - You'll love it!

Sunday, May 1, 2011

Project of the Month - May 2011 Kimono Slippers

This month I wanted to do a project that was just for me. I regularly make gifts for other people and items for my shop, but rarely take the time to make something nice for myself. I figured that it could be my turn to get a wonderful item handmade by me!

I was searching on Etsy for some inspiration and found a wonderful shop, Lena’s Patterns.  Lena has a great selection of patterns for babies, children, and adults as well as some home decor patterns.

I saw the pattern for the Kimono Shoes and wanted a pair of my very own. I also thought that they would make a lovely gift for some dear friends of mine so I bought it.

The pattern was delivered quickly and was very clear, easy to read and follow along. The pictures that accompanied the instructions were very great. 

It is still cold here in Alberta so I used anti-pill fleece as the lining instead of cotton and I did not add interfacing because the fleece made the shoes stand up enough. I also used my serger instead of my sewing machine to finish off the edges.

I think it took me about 90 minutes to cut out and put together 3 pairs of adult shoes. I think I could have completed them faster on my own but my daughter wanted to help so we went a little slower. We had fun together and made some great shoes.

My pair was pink fleece on the inside and green cotton on the outside.


Once my shoes were done, my daughter took them and wore them all over the house. They were loads to big, because her feet are much smaller than mine. She declared that she loved them and wanted a pair of her very own, that were made just for her. 

So, back to Lena’s shop I went and bought the children’s pattern for the Kimono shoes. Thank goodness she had one.

We picked out some fabrics and about 30 minutes later my daughter had her very own kimono shoes. She is so pleased with them!


Thank you for a fabulous pattern Lena and for letting me share my project with everyone!

Lena’s Patterns are available in her Etsy shop.

Saturday, February 19, 2011

Personalized Applique Bath Towel or Beach Towel

My daughter was invited to a birthday party for a friend of hers this weekend – a little boy.

She wanted to get him a present that she knew he would love and something that was unique and “special just for him”

Something that he would love – no problem – he LOVES Thomas the Train so she picked out a train for him.

Something unique and “special just for him” was a little tougher to find so I turned to my sewing machine and made a personalized bath towel. I made several of these towels last year for my daughter and some of her other friends. I figured out how to do them based on trial and error. There were quite a few errors before I got it right!!

These personalized towels are great to take to the beach, swimming lessons and on holidays. You always know which towel is yours at a glance.

This is an especially great gift for those people with unique names.

Depending on your choice of towel and fabric these can also be a very economical gift. They do take time but supplies are not very costly and should be easy to find. Make your fabric choices based on the person the towel is for, OR use it as a stash buster project and use up what you have on hand. The small amount of fabric needed makes it pretty easy to do both.

My daughter picked out the fabric for each of the letters in this example and kept me company while I sewed it. She was very excited to give her friend a special, personalized gift and she said that he was very excited to receive something with his name on it.

Here is a quick and easy tutorial on how to make a personalized appliqué bath towel.

Supplies:
1 bath towel (We used a large bath sheet but you can use whatever size you want)
HeatnBond iron on adhesive
Assorted cotton fabric scraps for letters 
             (You can experiment with different types of fabric if you want, BUT cotton washes really well)
Scissors, pins, iron, marking pen & thread

Decide what size and type of letters you want – I photocopied some from an old craft book I had at home. You can draw some freehand or find a template on the internet to use.It is easier to sew larger block style letters than small, swirly ones!

Cut pieces of fabric slightly larger than the size of the letters you want to use. I cut my pieces in squares.

Follow the instructions on the HeatnBond to attach the fabric pieces to it.

Basically, arrange the fabric pieces, right side up on the HeatnBond. Run your iron over them to activate the adhesive on one side. 

Once the pieces are all secured to the HeatnBond – trace your letters onto the fabric and cut them out.

Lay the towel out and find the middle. Mark it with a pin so you know where it is. 

This name had 6 letters. I positioned the letters 4” from the top of the towel, with 3 letters on each side of the centre line. I put these letters all in a straight line but you can space yours out any way you want. Make them wavy, diagonal, curved, whichever way you want.


Once you have the spacing figured out, peel the back off the letters. Recheck your spacing to make sure that it is just the way you want it.

Iron the letters to the towel. Make sure that they stick well so that it will be easier for you to sew. If you don't secure them well here they will move when you begin sewing around them.

Once all the letters are ironed down your towel should look something like this.

The next step is to stitch around each letter to seal the raw edges and make the letters stand out a bit. 

It is best to go slowly to make sure that the stitches are even and neat.

This is the time consuming part, especially if the name is a longer one. 

I use a basic zigzag stitch with a stitch length of 2.5, and stitch spacing of 1.0. On my machine it makes a very nice satin stitch. I recommend you try a few test runs to get the setting right BEFORE you start stitching on the towel. 

Stitch slowly around each letter, covering up all the exposed edges.  

Once all the letters are stitched around, clip any loose threads and VOILA!!!

Here is the finished towel. 

Thursday, August 19, 2010

At long last ......


At long last the much anticipated purse for my friend is DONE!!!!

I am so happy with the way it turned out!!!

It is bigger than I anticipated but now she will have lots of room to carry all of her most important things with her.

I am delivering it in September when we got out to visit her in Victoria, BC.

I am really looking forward to seeing her :)

Here is a sneak peek at it's total fabulous-ness!!


Saturday, May 29, 2010

The Project continues

POCKETS, POCKETS, POCKETS!!

I took a little break from my friend's purse to make some things for my daughter and some more things for my shop. I still have lots more projects in the works but really wanted to get to work on this purse again. I am still totally in love with the fabric and really want to see the finished results.

I added pockets to the inside and outside of the purse today. The outside pocket has a flap that closes with a magnetic snap to keep everything safe inside. It is big enough for a cell phone, a set of keys, chewing gum, CD's, a small notepad, or whatever else a person needs close and easy to access.

There were only supposed to be a few small pockets inside but I really like lots of places to stash things when I need to, so I added extra big pockets to the inside and then split them up in a few places. The result is lots of places to keep all kinds of great things.


I got the rest of the lining finished too and am hoping to put together the rest of the outside over the next week.

I bought some leather handles, which will look really sharp. They arrived a couple weeks ago and I have been getting anxious to put them on the purse and see the final effect.

Saturday, April 10, 2010

New project in the Works

Here is the first picture of a new project I am working on:


I am working on a new project for my very good friend.


She picked my absolute favorite fabric and asked me to make her a handbag with it.


She picked the style and I started cutting out pieces this week.


I just have the outside fabric left to cut - a striking Black & Red Batik.


I confess I am a little bit nervous about cutting it because if I mess it up there's no going back. There is no more of the fabric at the shop where I bought it in Salmon Arm, BC.


I am thinking of posting some updates here as I work on her bag - then she can see how it looks as I work on it.
I will post some more once I get some sewing done

Thursday, April 16, 2009

Sunshine and Rainbows

The sun is out and my daughter danced around the house today singing "Sunshine & Rainbows Mommy!". It was pretty cute and I think that it made my day.

We looked and looked but could not find a rainbow - lots of sunshine though. We are all dreaming of Spring :)

Just listed a new hat in my shop this morning. I love the fabric - it is so bright and reminds me of a starry sky at night! http://www.etsy.com/view_listing.php?listing_id=23772821

I have also been checking out Etsy Teams today and became a member of the Custom Boutique Design & Creations Team and applied to be a member of some others.

Check it out: the link to the teamCBDC site is http://cbdconetsy.ning.com/